Русский
  English
  Registration


Proxy Server Configuration
04 JanInstructions: Setting up the Proxy SwitchyOmega extension for Google Chrome in 30 seconds

Google Chrome and proxy technology
A proxy server is an intermediary between the desired site and the user. It can impersonate you as a citizen of another country so that you can view the resources blocked for your country. There are many more useful proxy features, all of which are available in Google Chrome. In the Google Chrome settings, there is a System item where the “Proxy Server Settings” are located. But there is one problem – when you try to install through this point, the program takes you to the Windows network settings. You can specify the IP address and port there, but then other browsers will also start working through a proxy. That is, there is a global reconfiguration of the system to a proxy server. To avoid this problem and work with proxies only in Google Chrome, use the Proxy SwitchyOmega extension, which gives the browser additional features:- work with multiple profiles;
- auto-switching: switching between proxy servers;
- rules for individual sites, etc.
Configuring Proxy SwitchyOmega
Installation
To install the extension: Install the extension reference- Open an empty tab and tap the Apps icon in the top left corner. Or enter https://chrome.google.com/webstore in the search bar – you will get to the extension store.
- Enter the name of the extension in the search bar, press enter. The SwitchyOmega app will appear in the search results list. Click Install.
Tuning
Buy individual proxies for any purpose – Purchase from 5 days. Wholesale prices Immediately after installation, the extension will open and you can start configuring. You can do this later by clicking on the ring icon next to the search bar and selecting Options. Setup steps: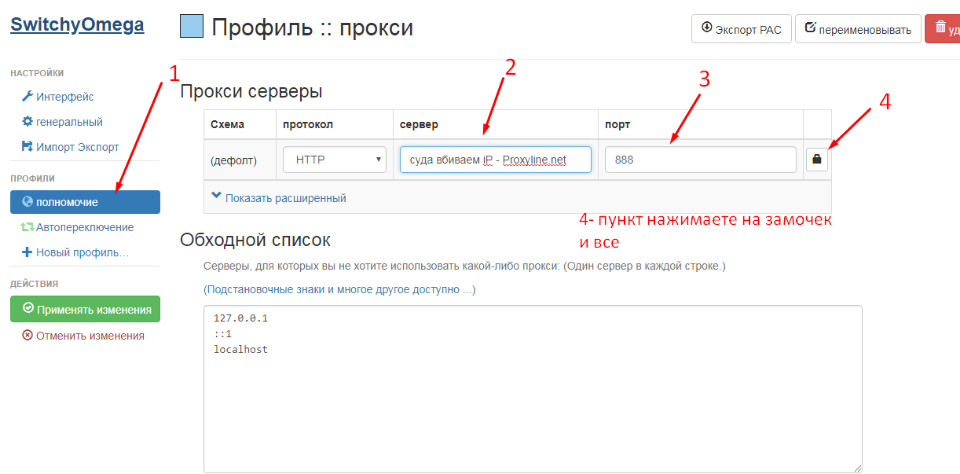
- Create a new profile by clicking New Profile.
- Come up with a name, leave the default profile type as Proxy, click Create.
- Next, go to the profile settings, where you need to enter the type of protocol – Direct is set by default, i.e. without a proxy.
- After selecting the type, the fields next to each other will become active – enter the IP address in the Server field and the port number in the Port field.
- If you have an individual passwordwith a username and password, enter them by clicking on the lock icon.
- Bypass list – here you can list the favorite sites on which the proxy will not work.
- Click Apply changes, done.
Shut down
2 ways:- Click on the ring, there is a shutdown icon (System Proxy). The ring will turn black, the browser will start working at the level of the OS system settings. And if they also have a proxy, it will be used.
- Click on the ring, the arrow icon (Direct), the ring will turn gray, the browser will start working directly, ignoring any proxies, even system ones.