Русский
  English
  Registration


18 JanInstruction. How to set up an iPv6 proxy on windows in 30 seconds

IPv6 proxies are considered an improved version of IPv4 with a perfect type of encryption that provides maximum protection for the personal data of an Internet user. This type of protocol has many undeniable advantages:
- The ability to purchase a dynamic address even if you use a statistical IP.
- High connection speed and significant traffic savings due to data caching.
- Reasonable cost, which is explained by the large number of free IPs.
- High degree of privacy.
- Guarantee of bypassing the blocking of any web portals.
IPv6 proxies are indispensable for SEO optimization, promotion of goods and services on social networks, and web surfing. The only point is that many popular Russian social networks and sites are not yet compatible with the sixth version, but the transition to it in the future is inevitable. We bring to your attention a step-by-step guide on how to configure ipv6 on windows and deactivate the proxy. Buy Custom iPv6 Proxies for Any Purpose.
Setting up proxy ipv6 on Windows
First, we recommend that you check if your connection type supports this proxy protocol – this is especially important if you are using the paid version. Go to the Network and Sharing Center, open the Connection tab, and then look for the Connect Protocol v6 option under Properties. The process of setting up a proxy server on Windows OS looks like this: 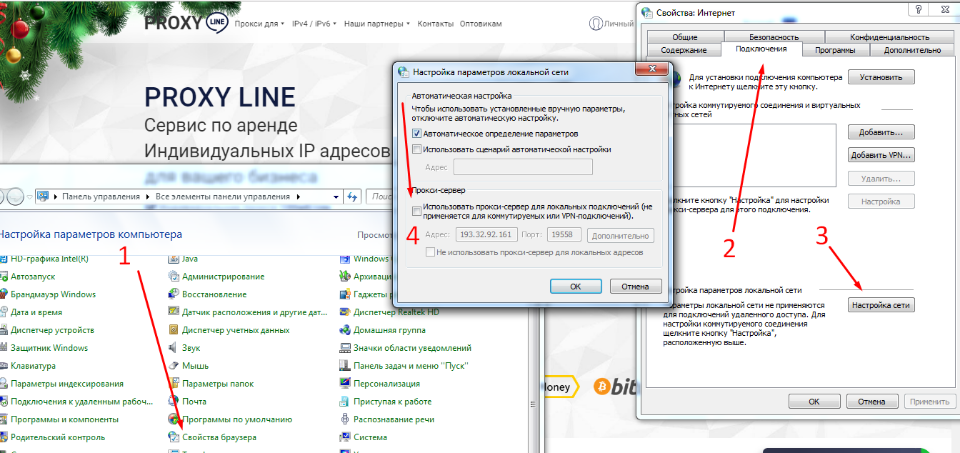
- Open the “Control Panel” and go to the “Browser Properties” section.
- This will open the Internet Properties window. There is another way to get to this section: hold down the Windows key and the “R” button at the same time. In the field that appears, enter inetcpl.cpl.
- Go to the “Connections” tab and click “Network Setup”. Sometimes it is also called “LAN Setup”.
- Allow the use of proxies for local connections by ticking the appropriate option.
- In the necessary fields, write down the IP address and working port of the server used. If necessary, you can set certain proxy parameters or select the “one proxy server for all protocols” function by ticking the appropriate line in the “Advanced” section.
- Save the changes made by clicking the “OK” button.
Such instructions are suitable for activating an individual proxy server on Windows of any version. Please note: if you have a list of websites that do not require a personal IP to go to, enter the addresses separated by a semicolon in the line “Do not use a proxy server for…”. If necessary, you can change the settings of the proxy server in the same way – for example, in the case when you decide to use a different IP, or the list of addresses for which you do not need to use a proxy has been replenished. Do not forget to confirm all the manipulations performed by clicking on “OK”.
Disabling IPv6 proxy server on windows
To stop working in the OS through a private proxy, re-enter the “Internet Properties” section using the instructions above and select the “Connections” tab. Then, find the section that talks about dial-up connections and VPN networks. Select the type of connection you want to use in the future and go to Network Settings. Prohibit the use of proxies for this connection by unchecking the corresponding option and clicking “OK”. In this way, you will return to work or surfing the web as usual. Proxy deactivation is not a personal whim of the user, but rather a necessity that arises if the selected server is not satisfactory in terms of quality. To avoid problems when working with a proxy, we recommend purchasing proven paid IPs, which are characterized by functionality, reliability, and consistently high data download speed.